Create & Manage VEX Rules
A VEX rule automates a VEX decision for a repository. Instead of assessing vulnerabilities one at a time, you write a CEL expression that matches a set of dependency vulnerabilities, and DevGuard applies your decision to every match — immediately, and to every future finding that matches the same expression.
What a rule consists of
A rule is always scoped to a single repository.
| Field | Required | Notes |
|---|---|---|
| Title | yes | Short, human-readable name |
| CEL expression | yes | Must be syntactically valid; checked live as you type |
| Justification | yes | Markdown, maximum 4000 characters |
| Effect | yes | False positive, Accept risk, or Reopen |
| Mechanical justification | only for false positives | One of five standardized reasons |
A rule's identity is derived from (repository, CEL expression, source). Two consequences follow, and both matter in practice:
- Importing the same VEX statement twice creates no duplicate.
- Changing the expression produces a different rule. The UI handles this for you (see Edit a rule), but this is why the button is labelled recreate.
Create a rule from the playground
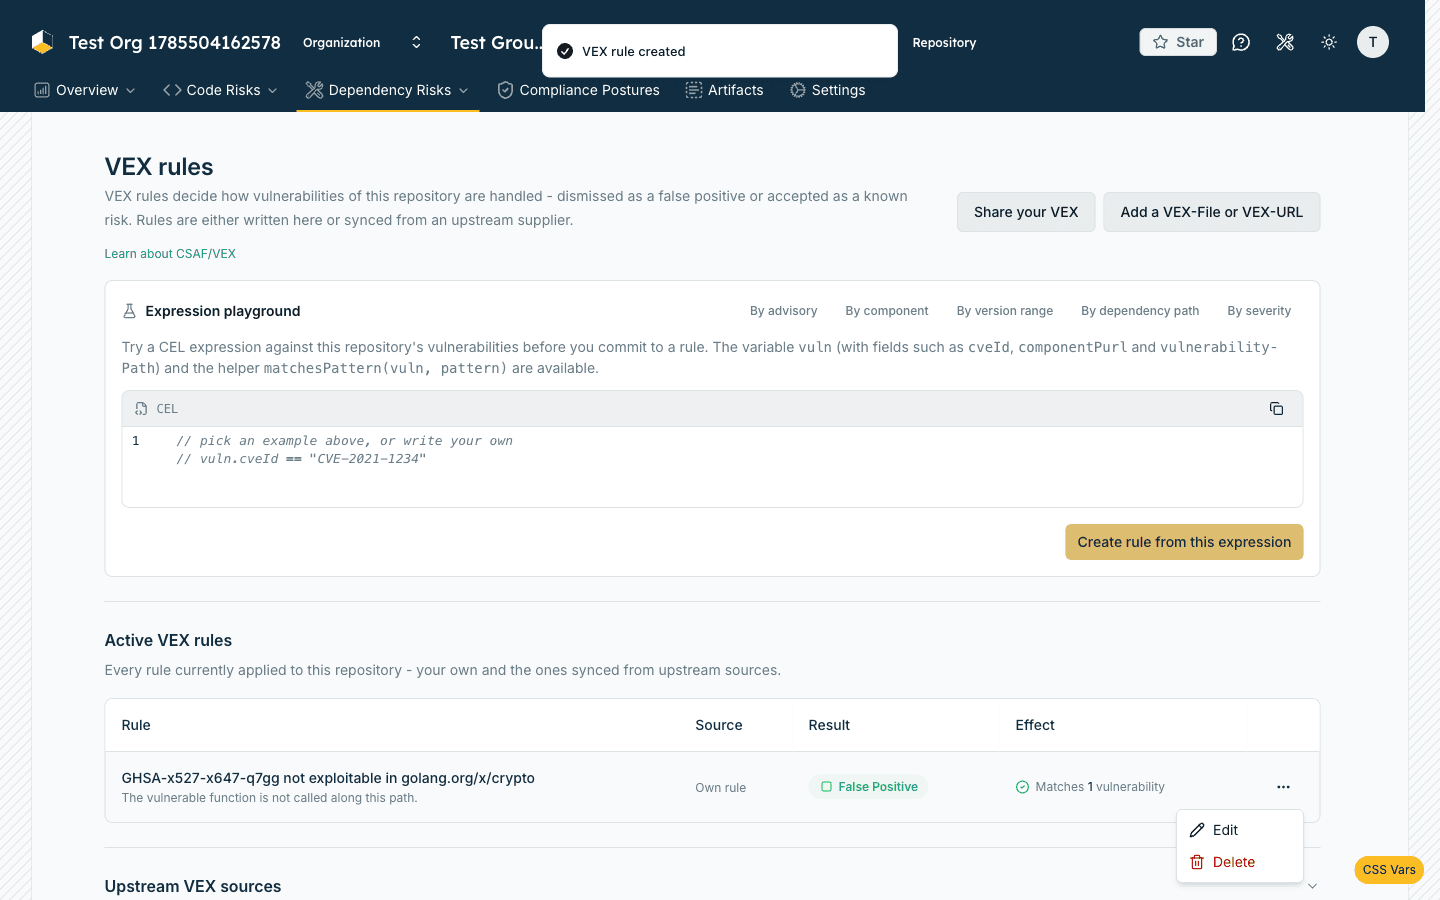
The playground is the fastest way to build a rule from scratch, because it tells you how many vulnerabilities an expression matches before you commit to it.
- Navigate to Dependency Risks → VEX Rules.
- In the Expression playground card, either click one of the example buttons —
By advisory,By component,By version range,By dependency path,By severity— or write your own expression. - Watch the status line below the editor. After a short pause it reports Matches N vulnerabilities, or the syntax error if the expression is malformed.
- Click Create rule from this expression.
- In the Add VEX rule dialog, fill in Title and Justification.
- Choose the effect, using the tabs at the top of the dialog:
- False positive — the primary split button marks matches as a false positive. Its label is the currently selected mechanical justification (default: Vulnerable Code Not In Execute Path). Use the chevron to pick a different one.
- Accept risk — the vulnerability is real, you knowingly carry the risk.
- Reopen — see Reopen once a fix is available below.
DevGuard evaluates the expression against the repository's dependency vulnerabilities right away, writes an event on every match, and recalculates the risk aggregation.
Create a rule from a vulnerability
Open any dependency vulnerability under Dependency Risks. Three entry points lead to a rule.
From the dependency path graph
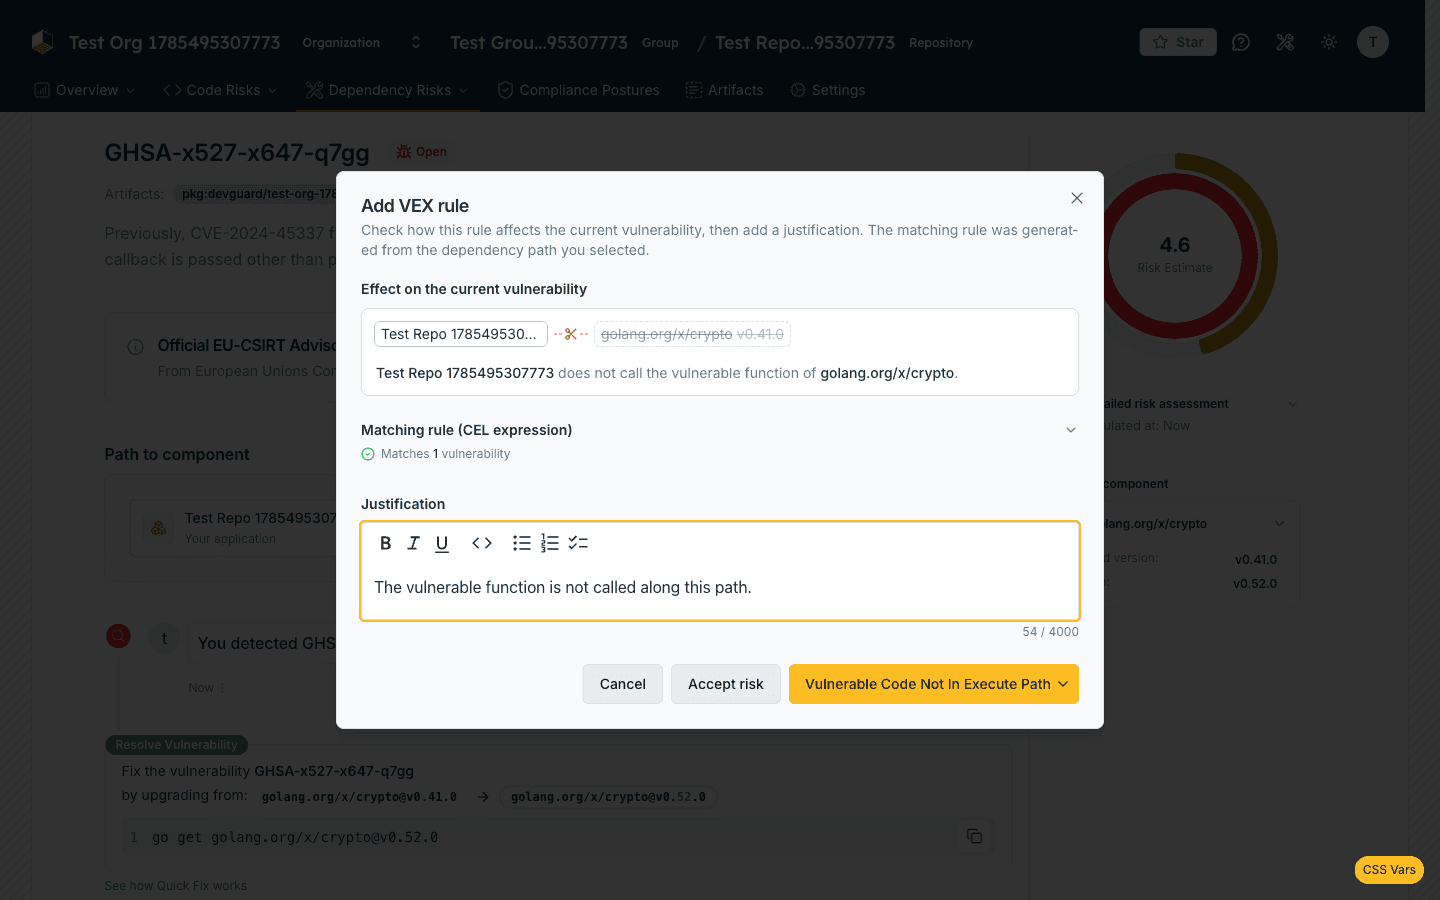
The Path to component graph renders the chain from your repository down to the vulnerable package. Every edge is labelled calls vulnerable function — an assumption, not a measurement. If you know an edge does not hold, click it.
DevGuard then opens the dialog pre-filled with:
- a title such as
CVE-2021-1234 not exploitable in brace-expansion - an expression that pins the CVE and the dependency path, so it dismisses every finding that arrives through that same path — not just the one in front of you:
When you click the very first edge — the one leaving your application — DevGuard uses the ROOT token
instead of *, which anchors the rule to all artifacts and branches of the repository:
The dialog shows an Effect on the current vulnerability card: the path as chips, with a scissors icon where your rule severs it, and everything below the cut struck through. Use it to confirm the rule does what you intend before saving.
From a crowdsourced VEX recommendation
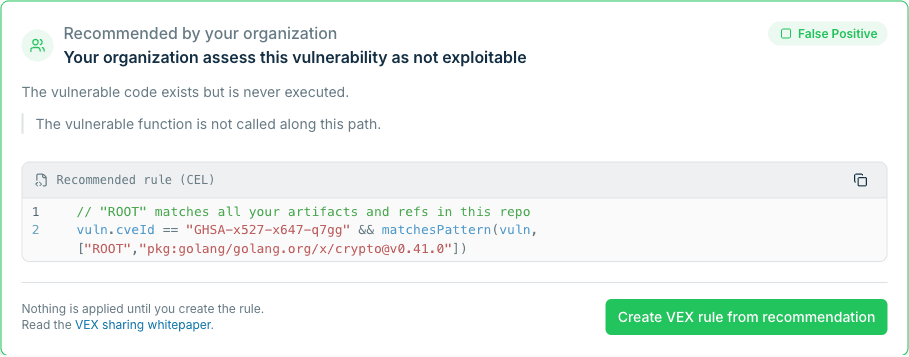
If other DevGuard organizations have already written the same rule — same CEL expression, same effect — for
this vulnerability, a green card appears: Others assess this vulnerability as not exploitable. It shows
an aggregated justification, the recommended expression, and a Verified badge when the supporting evidence
is strong. Create VEX rule from recommendation pre-fills everything.
DevGuard scores every matching organization's rule by an organization trust score (age, verification status,
prior contributions) and diminishes repeat votes from the same creator, so one account spamming identical
rules across many organizations cannot manufacture a recommendation. A recommendation only surfaces once
enough independent organizations clear that bar; the Verified badge marks the strongest ones.
Nothing is applied until you create the rule yourself — a recommendation is a suggestion pooled from other organizations' own decisions, never an automatic one. See Mitigation Strategies for how these recommendations are derived.
From the assessment bar
The Create VEX Rule button (keyboard: ⌘R) opens the dialog with an empty expression, for when you want
to write the match condition yourself.
Reopen once a fix is available
A Reopen rule matches vulnerabilities currently accepted as a known risk and reopens them — for example, once a fixed version is published for something you'd accepted only because there was nothing to fix yet.
-
Navigate to Dependency Risks → VEX Rules.
-
Write an expression in the Expression playground, this time matching on the fixed-version fields, e.g.:
-
Click Create rule from this expression.
-
In the Add VEX rule dialog, switch to the Reopen tab, then fill in Title and Justification.
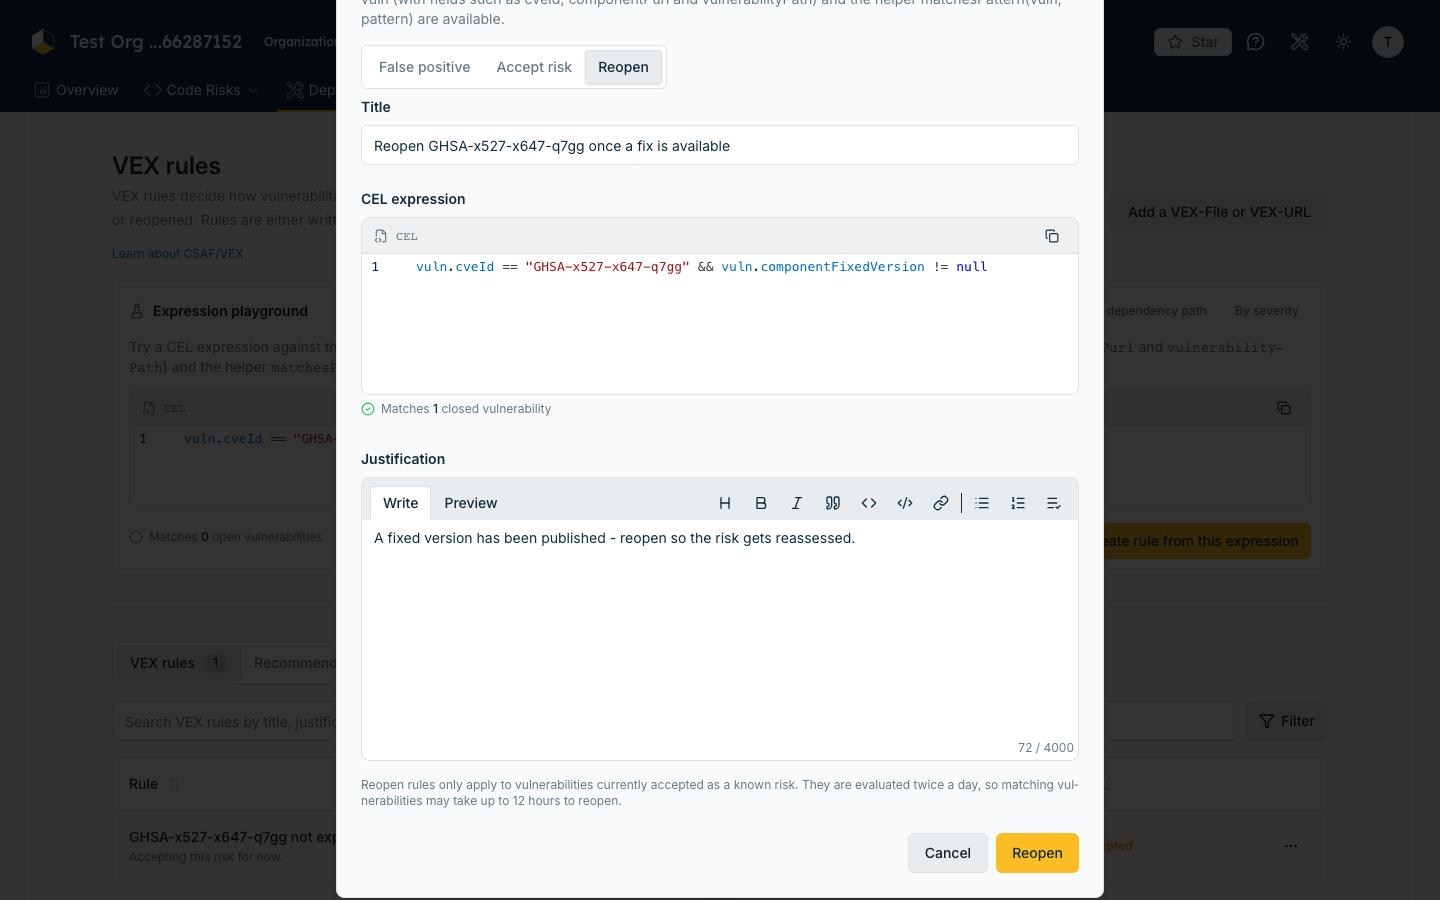
- Click Reopen to save the rule.
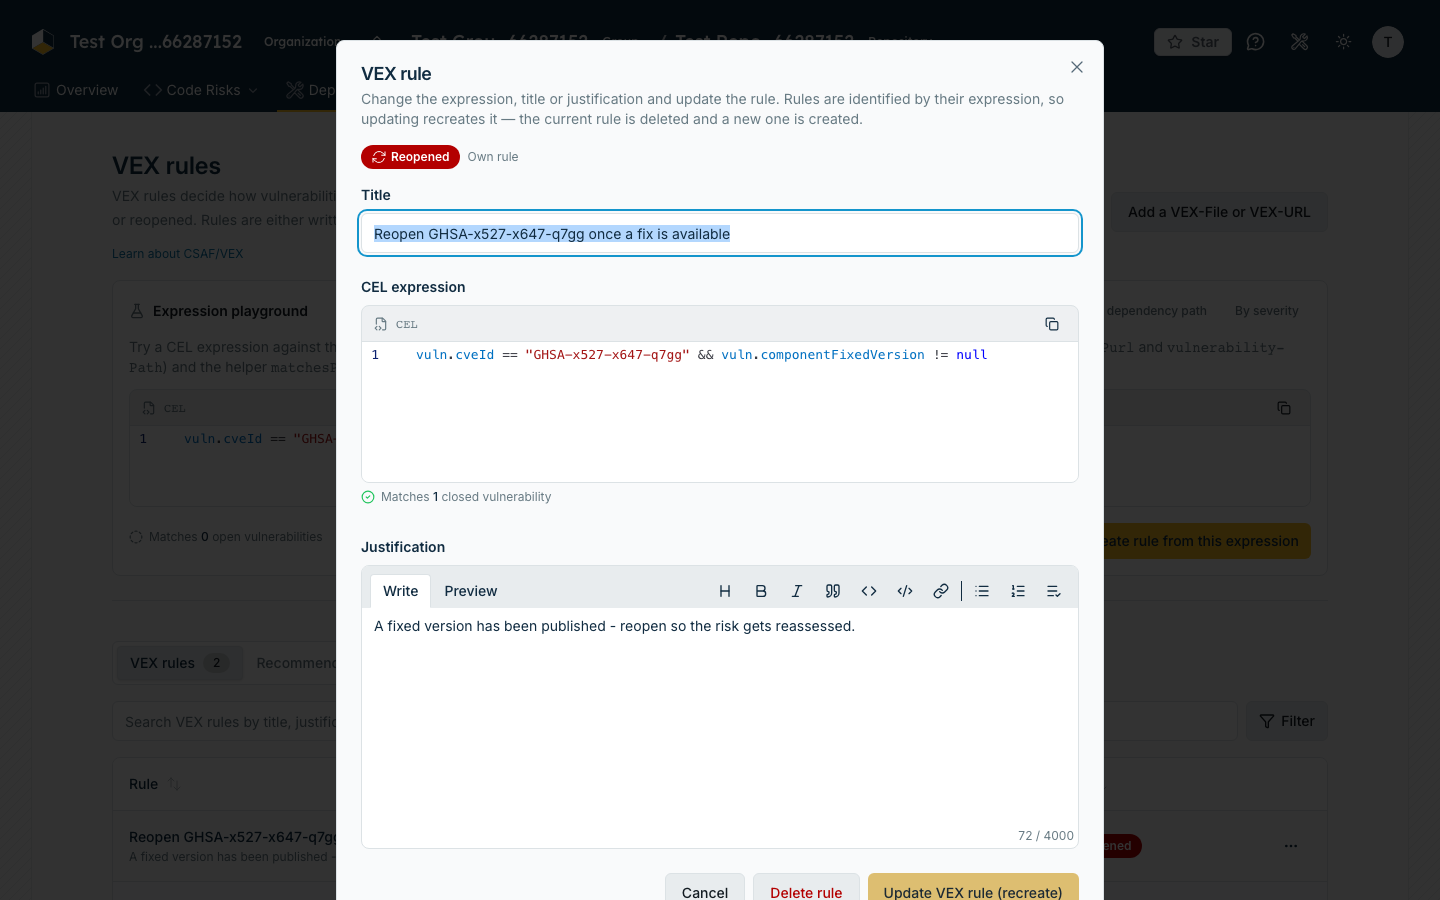
Open the rule's row afterwards to confirm it resolves against the vulnerability you expected — the details dialog reports Matches N closed vulnerabilities for a reopen rule, mirroring the open-vulnerability count shown for accept/false-positive rules:
See the CEL Expression Reference for the
componentFixedVersion / directDependencyFixedVersion fields this pattern relies on.
Reopen a stale accepted risk
A Reopen rule can also key off how long ago a finding's state last changed, rather than off a fixed version becoming available — useful for revisiting an accepted risk periodically instead of leaving it accepted indefinitely.
-
Navigate to Dependency Risks → VEX Rules.
-
Write an expression comparing
vuln.lastStateChangeagainst the current time:720his 30 days — CEL durations have no unit larger than hours, so express days as a multiple of24h. -
Click Create rule from this expression.
-
In the Add VEX rule dialog, switch to the Reopen tab, then fill in Title and Justification.
See Working with timestamps for the full now() /
timestamp() / duration() reference.
Edit a rule
Click any row in the Active VEX rules table to open the details dialog, change the title, expression or justification, then click Update VEX rule (recreate).
Because rule identity includes the expression, DevGuard implements this as delete-then-create. Two things follow:
- Editing a synced rule turns it into your own rule; it is no longer tied to the upstream source.
- If the recreation fails, DevGuard restores the previous rule and tells you so.
Read the rules table
| Column | Shows |
|---|---|
| Rule | Title (or the CVE id, or Untitled rule) plus a truncated justification |
| Source | Own rule for rules you wrote, or a Synced badge with the upstream URL on hover |
| Result | Accepted, False Positive, or Reopened; the raw mechanical justification appears on hover |
| Effect | How many vulnerabilities this rule currently handles |
A finding handled by an Accept risk or False positive rule shows a Handled by a VEX rule card with the matching expression, and its assessment controls are locked: A VEX rule is handling this vulnerability, so it's locked. To reopen it, delete the VEX rule — you can still comment. Writing a matching Reopen rule reopens it too, without deleting anything — but see the conflict warning above before you do.
Delete a rule
Either use the … menu in the rules table, or the Delete rule button in the details dialog, then
confirm.
When a rule is deleted, DevGuard walks each affected vulnerability's history backwards and restores the last state before the rule was applied. If there was no previous state, the vulnerability reopens.
Related Documentation
- CEL Expression Reference — every available field, function and token
- Choose a Mechanical Justification — which of the five reasons applies
- Import VEX from Files & Suppliers — rules created from uploads and upstream sources
- Prove a Finding Is Not Exploitable — evidence for a false-positive claim
- Create Vulnerability Events — the manual, single-finding equivalent
- VEX Rules API — the same operations over REST